Website Image Scripts
As part of working through designing a new website and learning to use HUGO static website generator I worked through a process of how I wanted to manage and optimize images.
This particular note has code snippets, which do not work well on a mobile browser, so be warned. To fully view the code, you’ll need to view this on your desktop.
Artist websites have issues other kinds of website not so dependent on images do not have. Images need to be clear enough to communicate about the artworks, which means relatively large images and image-heavy pages, and also images need to be optimized for fastest possible page loads on both desktops and mobile browsers, and yet images also need to be restricted in size and resolution to discourage piracy.
A balancing act.
I determined to set resolution at 102 px per inch, way less than optimal for printing, and restrict the size to under 1600 px on the longest side. I also ran into styling issues with portrait versus landscape oriented images. CSS (Cascading Style Sheets) and HTML don’t easily handle the size differences well. Landscape images end up having their longest side set to the same pixel width as the portrait oriented images, thus landscape images end up way smaller. This can be solved with javascript, complicated, or styling the images in css, hit-or-miss. The optimum solution for me was to embed each image into a square background, transparent for webp format images (for modern browsers) and with a solid background matching the website background color for jpg fall back images (for older browsers that don’t support webp).
I decided not to use a watermark. Instead I copyright artwork with the U.S. Copyright Office.
Optimizing images for the website demanded a whole new workflow. I use Fujifilm lenses and cameras for reference images, and the iPhone 15 Pro camera for on-the-go images. All images are imported into Capture One for organizing and editing. Capture One does a better job with raw format images from Fuji than other raw image programs. Once imported into Capture One, I edit them and export as 1600 px jpg images at 100% quality.
Those exported images go into a folder, spencemunsinger.com_source_images. For example, for the studio_notes images, they go to spencemunsinger.com_source_images/studio_notes/name-of-note/unprocessed. The images scripts are in the website directory at spencemunsinger.com/tools/bash/. Once the exported images from Capture One are in unprocessed, I run the create_images_v2.sh using something like
./create_images_v2.sh -k photo -t ../../../spencemunsinger.com_source_images/studio_notes/website_image_scripts/unprocessed
This is run from the spencemunsinger.com/tools/bash directory.
The run looks like
spence:spencemunsinger.com dsm$ cd tools/bash
spence:bash dsm$ ./create_images_v2.sh -k photo -t ../../../spencemunsinger.com_source-images/studio_notes/website_image_scripts/unprocessed/
Processing photo images with border & shadow...
1600px
Processing complete. Output directory: ../../../spencemunsinger.com_source-images/studio_notes/website_image_scripts/unprocessed//processed
1420px
Processing complete. Output directory: ../../../spencemunsinger.com_source-images/studio_notes/website_image_scripts/unprocessed//processed
1280px
Processing complete. Output directory: ../../../spencemunsinger.com_source-images/studio_notes/website_image_scripts/unprocessed//processed
1024px
Processing complete. Output directory: ../../../spencemunsinger.com_source-images/studio_notes/website_image_scripts/unprocessed//processed
768px
Processing complete. Output directory: ../../../spencemunsinger.com_source-images/studio_notes/website_image_scripts/unprocessed//processed
640px
Processing complete. Output directory: ../../../spencemunsinger.com_source-images/studio_notes/website_image_scripts/unprocessed//processed
480px
Processing complete. Output directory: ../../../spencemunsinger.com_source-images/studio_notes/website_image_scripts/unprocessed//processed
320px
Processing complete. Output directory: ../../../spencemunsinger.com_source-images/studio_notes/website_image_scripts/unprocessed//processed
Image processing completed...
spence:bash dsm$
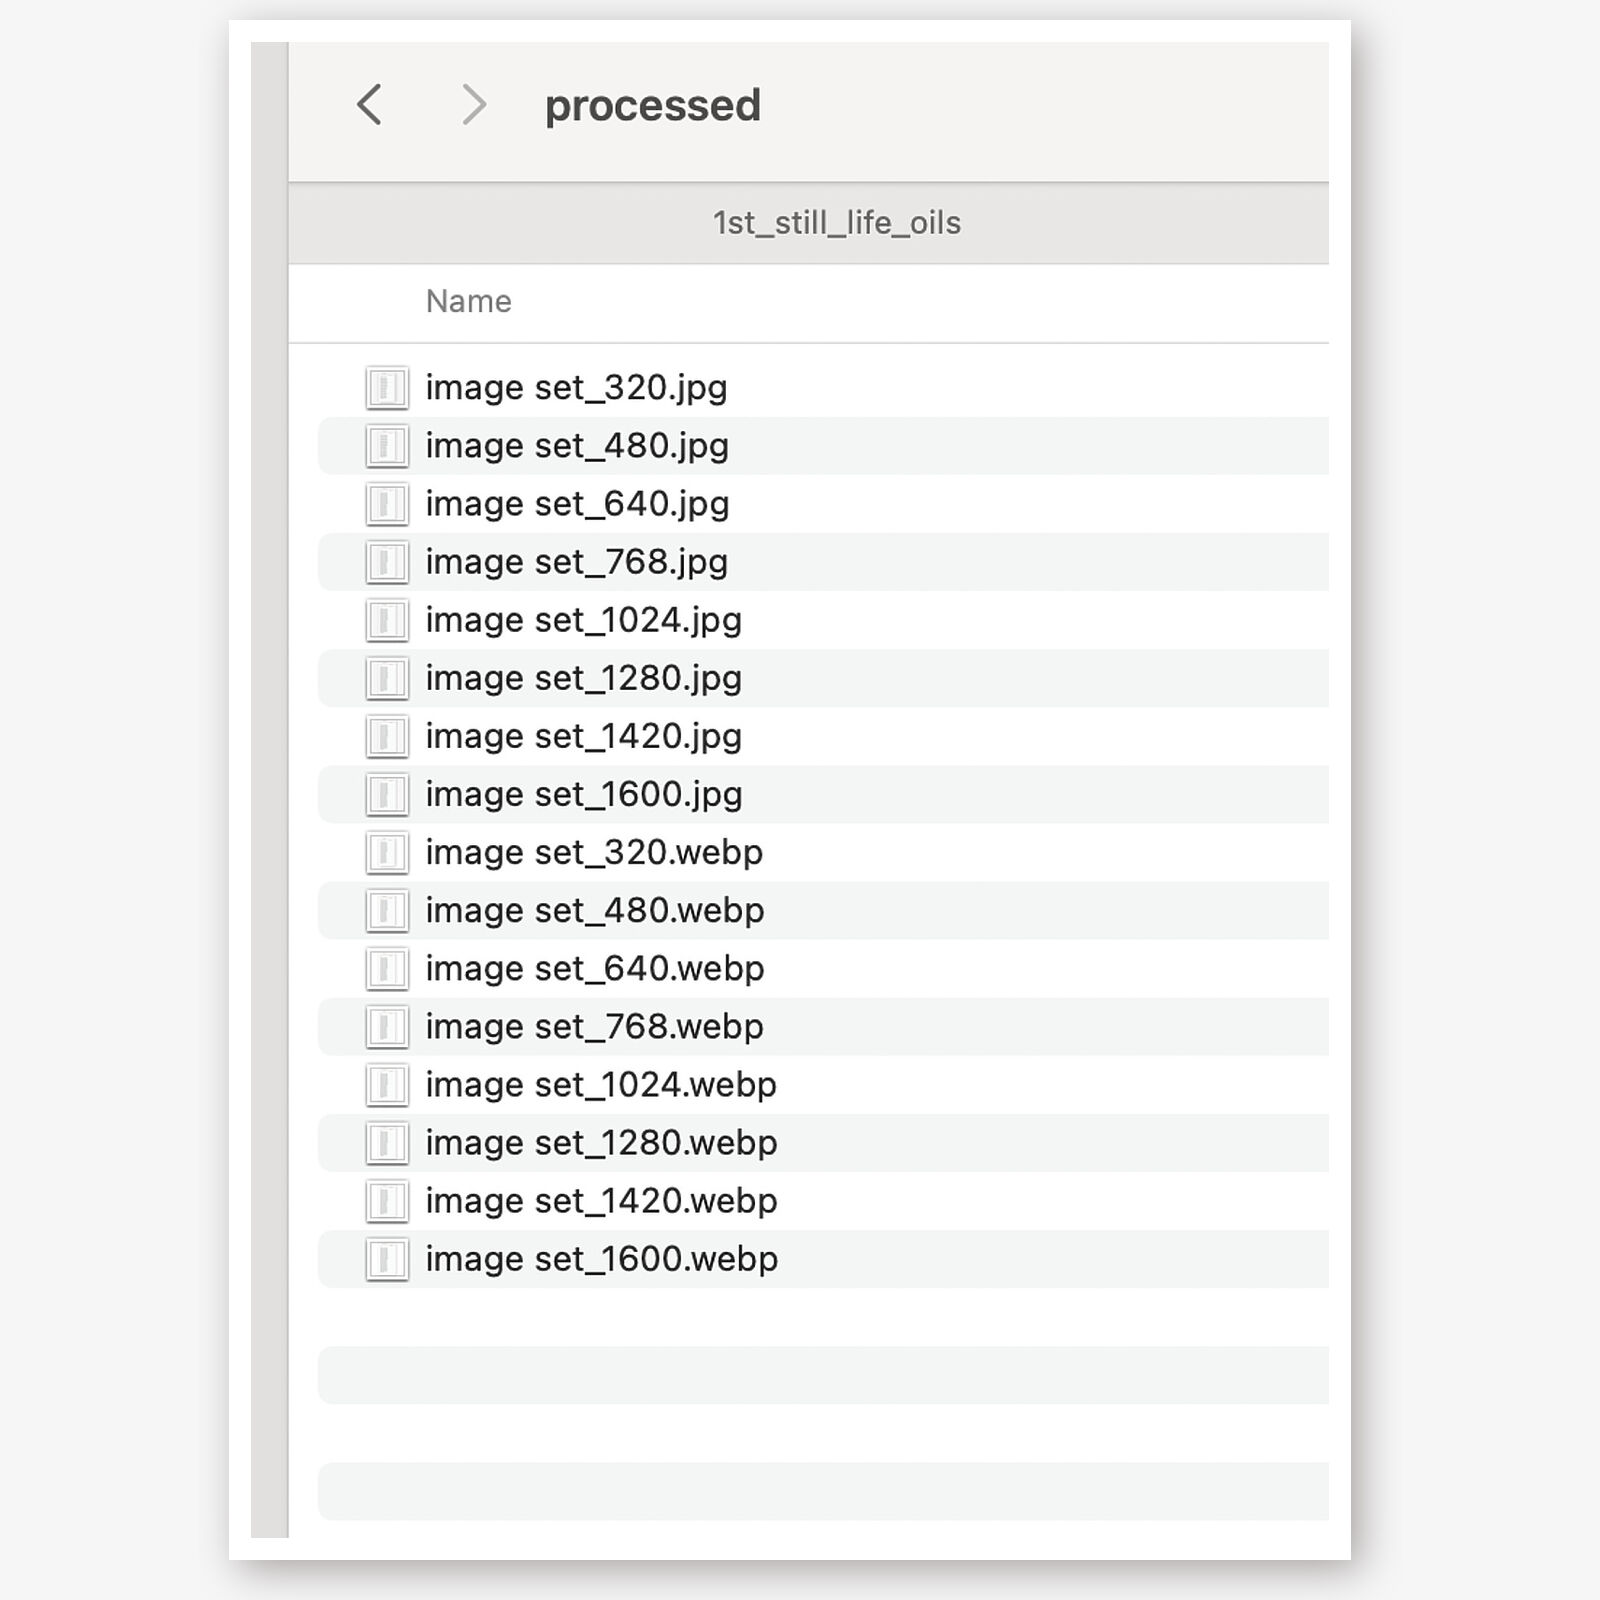
The resulting set looks like
The “-k” argument sets to either “photo” (which has a border) or “paint” (no border). “-t” is target, the path to where the unprocessed jpg image is located. This creates a folder “processed” inside the unprocessed folder. I copy that contents into the spencemunsinger.com_source_images/studio_notes/website_image_scripts directory, and once in place deleted the “processed” directory created. When used on the website, the image sets are copied to spencemunsinger.com/static/images/studio_notes/website_image_scripts. Only the processed images are copied over, the original unprocessed directory is not.
The process_images.sh script creates two images each time it is run, a webp format image embedded on a square transparent background, and a jpg formate image embedded in a square solid color background. The solid color is a match to the background of my website.
The create_images_v2.sh script calls the process_images.sh script to create 1600px, 1420px, 1280px, 1024px, 768px, 640px, 480px and 320px image pairs. This is probably overkill, I think I actually use the 1420px, 1024px, 768px and 320px image sizes. Creating these scripts was a back and forth between coding in HUGO for the images, deploying, testing with pagespeed.dev, fixing and further optimizing and tweaking the image scripts to align with those changes, regenerating image sets, and re-deploying the website, so culling images I’m not yet using and may never use hasn’t been part of this.
Once these image sets are in place, a <picture> element optimizes both size and format as supported by the requesting browser.
That element looks like
    <picture>

      <source
        srcset="/images/studio_notes/1st_still_life_tone_painting/tone_painting_1600.webp 1600w, /images/studio_notes/1st_still_life_tone_painting/tone_painting_768.webp 768w"
        sizes="(max-width: 768px) 100vw, 1600px"
        type="image/webp">


      <source
        srcset="/images/studio_notes/1st_still_life_tone_painting/tone_painting_1600.jpg 1600w, /images/studio_notes/1st_still_life_tone_painting/tone_painting_768.jpg 768w"
        sizes="(max-width: 768px) 100vw, 1600px"
        type="image/jpeg">


      <img
        src="/images/studio_notes/1st_still_life_tone_painting/tone_painting_1600.jpg"
        alt="Studio Notes Hero Image"
        width="1700"
        height="606"
        style="width: 100%; height: auto; object-fit: cover; display: block;"
        class="fullscreen-click"
      >
    </picture>
The image_process.sh script.
#!/bin/bash


# This script does
# create webp w/transparent background and jpg with solid background
# allows
# turning border on and off and configuring border specs
# turning shadow on or off and configuring shadow specs
# default solid background color, overriding with "-c"
# optional text overlay
# optional text format (default should be Courier-Prime 22px black)


# -------------------- default values -------------------- #


source=""                           # required arg source, file or directory
suffix=""                           # default is no change from original extension (.webp, .jpg)
canvas_size=1280                    # default square image size
shadow_setting="on"                 # default shadow is on
border_setting="on"                 # default border is on
border_size="22"                    # default border size
offset=62                           # how far image is placed from outside of square background
shadow_spec="-shadow 85x20+10+10"   # default shadow specification
                                    # opacity x blur + x_offset + y_offset
solid_color="#f6f6f6"               # default solid background color

# text overlay specs
overlay_text=""                         # empty means no overlay
overlay_font="Courier-Prime-Bold"       # default font
overlay_size="42"                       # default point size
overlay_color="#D2691E"                 # site title color...
vertical_offset=""                      # offset from bottom in pixels


# -------------------- usage -------------------- ##


usage() {
    cat <<EOF

Usage: $0 -s <source> [ -e <suffix> ] [ -c <canvas_size> ] [ -h <on|off> ]
                      [ -b <on|off> ] [ -o <padding> ] [ -f ]
                      [ -d <border_px> ] [ -n <shadow_spec> ]
                      [ -c <solid background color> ]
                      [-t <text for overlay> ] [ -f <text font> ] [ -z <font size> ]
                      [ -v <vertical offset from bottom in pixels> ]

Required:
  -s  Path to an image file or a folder containing images.

Optional:
  -e  Suffix for processed image names.         Default: "" (no change to extension)
  -i  Canvas size (width & height in px).       Default: 1280
  -h  Shadow setting: "on" or "off".            Default: "on"
  -b  Border setting: "on" or "off".            Default: "on" (22px white border)
  -o  Padding offset for image placement.       Default: 62
  -d  Border size in pixels (applies if -b on). Default: 22
  -n  Custom shadow specification (e.g., -shadow 60x15+5+5). Default: "-shadow 80x20+10+10"
  -c  Color for solid background (jpgs)
  -t  Text for text overlay
  -f  Text font
  -z  Font size (in points)
  -y  Font color
  -v  Vertical Offset from bottom of image in Pixels

Examples:
  $0 -s image.jpg
  $0 -s /path/to/folder -e _custom
  $0 -s image.jpg -i 800
  $0 -s image.jpg -h off
  $0 -s logo.png -b off
  $0 -s image.jpg -o 100
  $0 -s image.jpg -d 40
  $0 -s image.jpg -n "-shadow 60x15+5+5"
  $0 -s image.jpg -c "#464646"
  $0 -s image.jpg -t "Text to impose on image"
  $0 -s image.jpg -v "330"

To list fonts available to Imagemagick:
    magick -list font
e.g., "magick -list font | grep -i courier"

EOF
}


# -------------------- getopts and required arg(s) -------------------- #


while getopts "s:e:i:h:b:o:d:n:c:t:f:z:y:v:" opt; do
    case "$opt" in
        s) source="$OPTARG" ;;
        e) suffix="$OPTARG" ;;
        i) canvas_size="$OPTARG" ;;
        h) shadow_setting="$OPTARG" ;;
        b) border_setting="$OPTARG" ;;
        o) offset="$OPTARG" ;;
        d) border_size="$OPTARG" ;;
        n) shadow_spec="$OPTARG" ;;
        c) solid_color="$OPTARG" ;;
        t) overlay_text="$OPTARG" ;;
        f) overlay_font="$OPTARG"
           font_used="true"
           ;;
        z) overlay_size="$OPTARG"
           size_used="true"
           ;;
        y) overlay_color="$OPTARG"
           color_used="true"
           ;;
        v) vertical_offset="$OPTARG" ;;
        \?)
            usage
            exit 1
            ;;
    esac
done

# If -s is not provided, show usage and exit
if [ -z "$source" ]; then
    echo "Error: -s (source) is required."
    usage
    exit 1
fi

# If any of -f, -z, or -y were used, ensure -t was also provided
if [[ "$font_used" == "true" ]] || [[ "$size_used" == "true" ]] || [[ "$color_used" == "true" ]]; then
    if [ -z "$overlay_text" ]; then
        echo "Error: -f, -z, or -y was passed but -t (overlay text) is missing."
        usage
        exit 1
    fi
fi

# set canvas size here, always square...
canvas_dimensions="${canvas_size}x${canvas_size}"

# calculate position of overlay text if submitted...
# ImageMagick’s -annotate +x+y offset is always in pixels
# if passed, set this to the passed value, otherwise the default is 1/3 from bottom
if [ -z "$vertical_offset" ]; then
    vertical_offset=$(( canvas_size / 3 ))
fi

# -------------------- jpg w/solid background -------------------- #


# this creates jpgs embedded on solid background as fallbacks from webp

process_image_jpg() {
    local input_image="$1"
    local output_dir="$2"

    local base_name
    base_name=$(basename "$input_image")
    local file_name="${base_name%.*}"

    # Decide extension and output format
    local extension="jpg"
    local quality_arg="-quality 80"

    local output_image="${output_dir}/${file_name}${suffix}.${extension}"

    # Get the source image's dimensions
    local dimensions
    dimensions=$(magick identify -format "%w %h" "$input_image" 2>/dev/null)
    if [ -z "$dimensions" ]; then
        echo "Skipping invalid image file: $input_image"
        return
    fi

    local width
    local height
    width=$(echo "$dimensions" | awk '{print $1}')
    height=$(echo "$dimensions" | awk '{print $2}')

    # Adjust offset if border is enabled
    local adjusted_offset="$offset"
    if [ "$border_setting" = "on" ]; then
        adjusted_offset=$((offset + border_size))
    fi

    # Determine resize dimensions
    local resize_width
    local resize_height
    if [ "$width" -gt "$height" ]; then
        resize_width=$((canvas_size - adjusted_offset))
        resize_height=$(awk "BEGIN {print $resize_width * $height / $width}")
    else
        resize_height=$((canvas_size - adjusted_offset))
        resize_width=$(awk "BEGIN {print $resize_height * $width / $height}")
    fi

    # Round to integers
    resize_width=$(printf "%.0f" "$resize_width")
    resize_height=$(printf "%.0f" "$resize_height")

    # Prepare optional overlay_args
    local overlay_args=()
    if [ -n "$overlay_text" ]; then
        overlay_args+=(-font "$overlay_font")
        overlay_args+=(-pointsize "$overlay_size")
        overlay_args+=(-fill "$overlay_color")
        # You can adjust gravity (North, South, Center, etc.) and offsets here:
        overlay_args+=(-gravity South)
        overlay_args+=( -annotate +0+${vertical_offset} "$overlay_text" )
    fi

    # Shadow off...
    if [ "$shadow_setting" = "off" ]; then
        # No shadow, w/border
        if [ "$border_setting" = "on" ]; then
        magick \
            "$input_image" -auto-orient -resize "${resize_width}x${resize_height}" \
            -bordercolor white -border "$border_size" \
            -background "$solid_color" -gravity center -extent "$canvas_dimensions" \
            -flatten -strip \
            $quality_arg \
            "${overlay_args[@]}" \
            "$output_image"
        # No shadow, no border
        else
        magick \
            "$input_image" -auto-orient -resize "${resize_width}x${resize_height}" \
            -background "$solid_color" -gravity center -extent "$canvas_dimensions" \
            -flatten -strip \
            $quality_arg \
            "${overlay_args[@]}" \
            "$output_image"
        fi
    # Shadow on...
    else
        # With shadow + border
        if [ "$border_setting" = "on" ]; then
            magick \
                "$input_image" -auto-orient -resize "${resize_width}x${resize_height}" \
                -bordercolor white -border "$border_size" \
                \( +clone -background '#9a9393' $shadow_spec \) \
                +swap -background "$solid_color" -layers merge +repage \
                -gravity center -extent "$canvas_dimensions" \
                -background "$solid_color" -flatten \
                -strip \
                $quality_arg \
                "${overlay_args[@]}" \
                "$output_image"
        # With shadow, no border
        else
            magick \
                "$input_image" -auto-orient -resize "${resize_width}x${resize_height}" \
                \( +clone -background '#9a9393' $shadow_spec \) \
                +swap -background "$solid_color" -layers merge +repage \
                -gravity center -extent "$canvas_dimensions" \
                -background "$solid_color" -flatten \
                -strip \
                $quality_arg \
                "${overlay_args[@]}" \
                "$output_image"
        fi
    fi
}


# -------------------- webp w/transparent background -------------------- #


# creates webp on transparent background

process_image_webp() {
    local input_image="$1"
    local output_dir="$2"

    local base_name
    base_name=$(basename "$input_image")
    local file_name="${base_name%.*}"

    # Decide extension and output format
    local extension="webp"
    local quality_arg="-quality 80"
    if [ "$format" = "png" ]; then
        extension="png"
        # PNG doesn't use "-quality" in quite the same way, but we can keep it simple
        quality_arg=""  # Not needed for PNG in this scenario
    fi

    local output_image="${output_dir}/${file_name}${suffix}.${extension}"

    # Get the source image's dimensions
    local dimensions
    dimensions=$(magick identify -format "%w %h" "$input_image" 2>/dev/null)
    if [ -z "$dimensions" ]; then
        echo "Skipping invalid image file: $input_image"
        return
    fi

    local width
    local height
    width=$(echo "$dimensions" | awk '{print $1}')
    height=$(echo "$dimensions" | awk '{print $2}')

    # Adjust offset if border is enabled
    local adjusted_offset="$offset"
    if [ "$border_setting" = "on" ]; then
        adjusted_offset=$((offset + border_size))
    fi

    # Determine resize dimensions
    local resize_width
    local resize_height
    if [ "$width" -gt "$height" ]; then
        resize_width=$((canvas_size - adjusted_offset))
        resize_height=$(awk "BEGIN {print $resize_width * $height / $width}")
    else
        resize_height=$((canvas_size - adjusted_offset))
        resize_width=$(awk "BEGIN {print $resize_height * $width / $height}")
    fi

    # Round to integers
    resize_width=$(printf "%.0f" "$resize_width")
    resize_height=$(printf "%.0f" "$resize_height")

    # Prepare optional overlay_args
    local overlay_args=()
    if [ -n "$overlay_text" ]; then
        overlay_args+=(-font "$overlay_font")
        overlay_args+=(-pointsize "$overlay_size")
        overlay_args+=(-fill "$overlay_color")
        # You can adjust gravity (North, South, Center, etc.) and offsets here:
        overlay_args+=(-gravity South)
        overlay_args+=( -annotate +0+${vertical_offset} "$overlay_text" )
    fi

    # Build the ImageMagick command (always remove metadata via -strip)
    if [ "$shadow_setting" = "off" ]; then
        # No shadow
        if [ "$border_setting" = "on" ]; then
            magick \
                \( "$input_image" -auto-orient -resize "${resize_width}x${resize_height}" \
                   -bordercolor white -border "${border_size}" \) \
                -background none \
                -gravity center \
                -extent "${canvas_dimensions}" \
                -strip \
                $quality_arg \
                "${overlay_args[@]}" \
                "$output_image"
        else
            magick \
                \( "$input_image" -auto-orient -resize "${resize_width}x${resize_height}" \) \
                -background none \
                -gravity center \
                -extent "${canvas_dimensions}" \
                -strip \
                $quality_arg \
                "${overlay_args[@]}" \
                "$output_image"
        fi
    else
        # With shadow
        if [ "$border_setting" = "on" ]; then
            magick \
                \( "$input_image" -auto-orient -resize "${resize_width}x${resize_height}" \
                   -bordercolor white -border "${border_size}" \) \
                \( +clone -background '#9a9393' $shadow_spec \) \
                +swap -background none -layers merge \
                -background none \
                -gravity center \
                -extent "${canvas_dimensions}" \
                -strip \
                $quality_arg \
                "${overlay_args[@]}" \
                "$output_image"
        else
            magick \
                \( "$input_image" -auto-orient -resize "${resize_width}x${resize_height}" \) \
                \( +clone -background '#9a9393' $shadow_spec \) \
                +swap -background none -layers merge \
                -background none \
                -gravity center \
                -extent "${canvas_dimensions}" \
                -strip \
                $quality_arg \
                "${overlay_args[@]}" \
                "$output_image"
        fi
    fi
}


# -------------------- main -------------------- #


if [ -d "$source" ]; then
    # If source is a directory
    output_dir="${source}/processed"
    mkdir -p "$output_dir"

    for image in "$source"/*; do
        if [[ -f "$image" && "$image" =~ \.(jpg|jpeg|png|gif|tif|tiff|webp|JPG|JPEG|PNG|GIF|TIF|TIFF|WEBP)$ ]]; then
            process_image_jpg "$image" "$output_dir"
            process_image_webp "$image" "$output_dir"
        fi
    done
elif [ -f "$source" ]; then
    # If source is a single file
    if [[ "$source" =~ \.(jpg|jpeg|png|gif|tif|tiff|webp|JPG|JPEG|PNG|GIF|TIF|TIFF|WEBP)$ ]]; then
        output_dir="$(dirname "$source")/processed"
        mkdir -p "$output_dir"
        process_image_jpg "$source" "$output_dir"
        process_image_webp "$source" "$output_dir"
    else
        echo "Error: File does not have a supported image extension."
        usage
        exit 1
    fi
else
    echo "Error: Invalid source. Please specify an image file or a folder."
    usage
    exit 1
fi

echo "Processing complete. Output directory: ${output_dir}"
And the create_images_v2.sh script.
#!/usr/bin/env bash

# Display usage information
usage() {
    echo "Usage: $0 -t <target_directory> -k <kind_of_image>"
    echo "  -t  Target directory for image files"
    echo "  -k  Kind of image ('photo' or 'paint')"
    exit 1
}

# Parse options
while getopts "t:k:" opt; do
    case $opt in
        t)
            target_directory="$OPTARG"
            ;;
        k)
            kind_of_image="$OPTARG"
            ;;
        *)
            usage
            ;;
    esac
done

# Check if both arguments are provided
if [[ -z "$target_directory" ]] || [[ -z "$kind_of_image" ]]; then
    usage
fi

# Check if the target directory exists
if [[ -d "$target_directory" ]]; then
    if [[ "$kind_of_image" == "photo" ]]; then

        echo "Processing photo images with border & shadow..."

        echo "1600px"
        ./process_images.sh -s "$target_directory" -i 1600 -o 82 -e _1600
        echo "1420px"
        ./process_images.sh -s "$target_directory" -i 1420 -o 76 -e _1420
        echo "1280px"
        ./process_images.sh -s "$target_directory" -i 1280 -o 72 -e _1280
        echo "1024px"
        ./process_images.sh -s "$target_directory" -i 1024 -d 16 -o 68 -n "-shadow 75x18+9+9" -e _1024
        echo "768px"
        ./process_images.sh -s "$target_directory" -i 768 -d 10 -o 62 -n "-shadow 70x15+8+8" -e _768
        echo "640px"
        ./process_images.sh -s "$target_directory" -i 640 -d 8 -o 60 -n "-shadow 65x14+7+7" -e _640
        echo "480px"
        ./process_images.sh -s "$target_directory" -i 480 -d 8 -o 60 -n "-shadow 65x14+7+7" -e _480
        echo "320px"
        ./process_images.sh -s "$target_directory" -i 320 -d 6 -o 56 -n "-shadow 60x15+7.5+7.5" -e _320

    elif [[ "$kind_of_image" == "paint" ]]; then

        echo "Processing painting images with no border, but with shadow..."

        echo "1600px"
        ./process_images.sh -s "$target_directory" -b off -i 1600 -o 82 -e _1600
        echo "1420px"
        ./process_images.sh -s "$target_directory" -b off -i 1420 -o 76 -e _1420
        echo "1280px"
        ./process_images.sh -s "$target_directory" -b off -i 1280 -o 72 -e _1280
        echo "1024px"
        ./process_images.sh -s "$target_directory" -b off -i 1024 -o 68 -n "-shadow 75x18+9+9" -e _1024
        echo "768px"
        ./process_images.sh -s "$target_directory" -b off -i 768 -o 62 -n "-shadow 70x15+8+8" -e _768
        echo "640px"
        ./process_images.sh -s "$target_directory" -b off -i 640 -o 60 -n "-shadow 65x14+7+7" -e _640
        echo "480px"
        ./process_images.sh -s "$target_directory" -b off -i 480 -o 60 -n "-shadow 65x14+7+7" -e _480
        echo "320px"
        ./process_images.sh -s "$target_directory" -b off -i 320 -o 56 -n "-shadow 60x15+7.5+7.5" -e _320

    else
        echo "Second argument not recognized. Please use 'photo' or 'paint'."
        usage
    fi

else
    echo "Target directory not found: $target_directory"
    exit 1
fi

echo "Image processing completed..."
These were developed to run on MacOS. In MacOS, you would install Homebrew, and then using homebrew install imagemagick, which is the command-line image manipulation tool the process_images.sh script uses. If you are running Windows, you are on your own, and google is your friend (as well as ChatGPT…). If Linux, imagemagick is easily installed.
Hope these are useful.
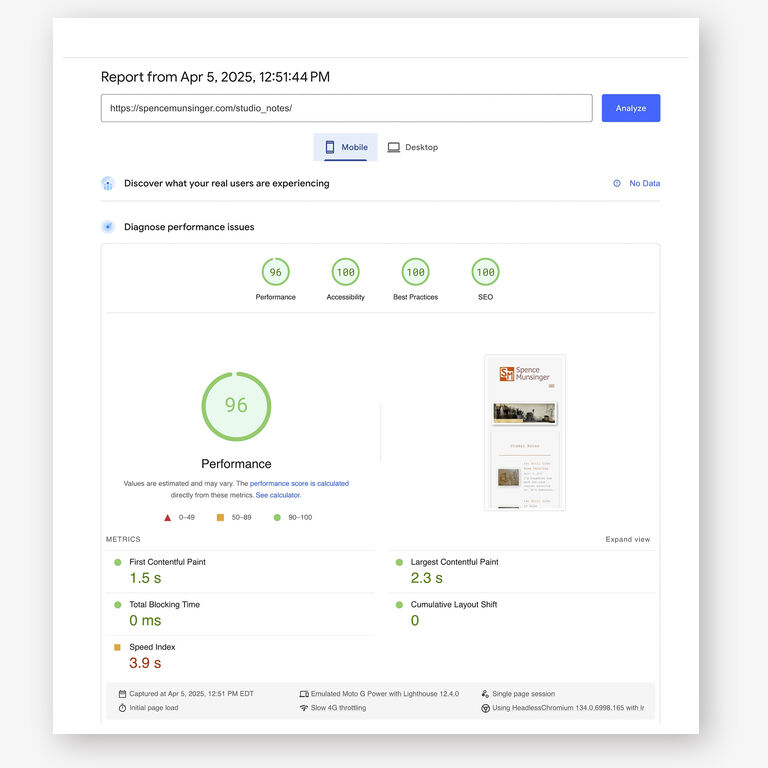
With some css that prevents the page loading from requiring layout shifts, this kind of image optimization results in 90 to 100 scores on image heavy pages.

—spence